Sunday, March 23, 2014

1/72 Airfix Avro Lancaster B.II - Work in Progress

I've alway had a passion for the almighty Avro Lancaster and B-17 Flying Fortress as they are both beautiful and the best heavy bombers of their time. Having decided to build both of them in 1/72 scale, my first choice was obviously the Lancaster as its a far more superior aircraft than the B-17! It's a pity though, that out of the 7,000 or so built throughout its history, only 2 are currently flight capable.

Although I bought this kit about a couple of weeks ago, I have been building it on and off as it's definitely not a weekend project where I can simply build, paint and finish a model in about 2 or 3 days. This kit has a lot of parts and quite a bit of painting needs to be done before the basic build is complete. By far it's an excellent kit as the quality is superb.

I did a little bit of research on which kit to purchase and decided on this particular model by Airfix as it was relatively cheap compared to other models and the release date was fairly recent. The only one "flaw" of this model is that it comes with the Hercules radial engine instead of the Merlin engine which most people are accustomed to. The kit doesn't come with any bombs but as I was planning to build the kit with the bomb bay doors closed, it doesn't really matter.


Here are some photos of my build progress :

1/72 Airfix Avro Lancaster B.II
The construction of the cockpit area with all the parts and interior walls painted. The instrument panel decal is a bit oversized. I just trimmed off the top to match the panel size.


1/72 Airfix Avro Lancaster B.II

1/72 Airfix Avro Lancaster B.II

1/72 Airfix Avro Lancaster B.II
A little bit of weathering done as well. I love the radio and map decals!


1/72 Airfix Avro Lancaster B.II
Basic build completed.


1/72 Airfix Avro Lancaster B.II
Next is the much dreaded masking procedure. I think it took me about 5-6 hours to complete all the masking and my passion for building heavy bombers came down a notch because of this.


1/72 Airfix Avro Lancaster B.II

1/72 Airfix Avro Lancaster B.II
Base coat of dark earth painted after preshading. Normally, I would paint the underside first then the topside but since the Lancaster was a night bomber and most of its fuselage was black, it would be easier to paint the lighter colors first.

I had the engines painted prior to attaching them to the cowls and masked off the openings with cardboards cut in circular shapes.


1/72 Airfix Avro Lancaster B.II
Preparing the camouflage mask. I scanned the decal/painting guide which comes with the kit, enlarged the image in Photoshop to match the wingspan then cut up the wings, fuselage and tail section so that it would fit into 2 sheets of A4 size paper for printing. 


1/72 Airfix Avro Lancaster B.II
Masking tape applied and ready for another round of painting.


1/72 Airfix Avro Lancaster B.II
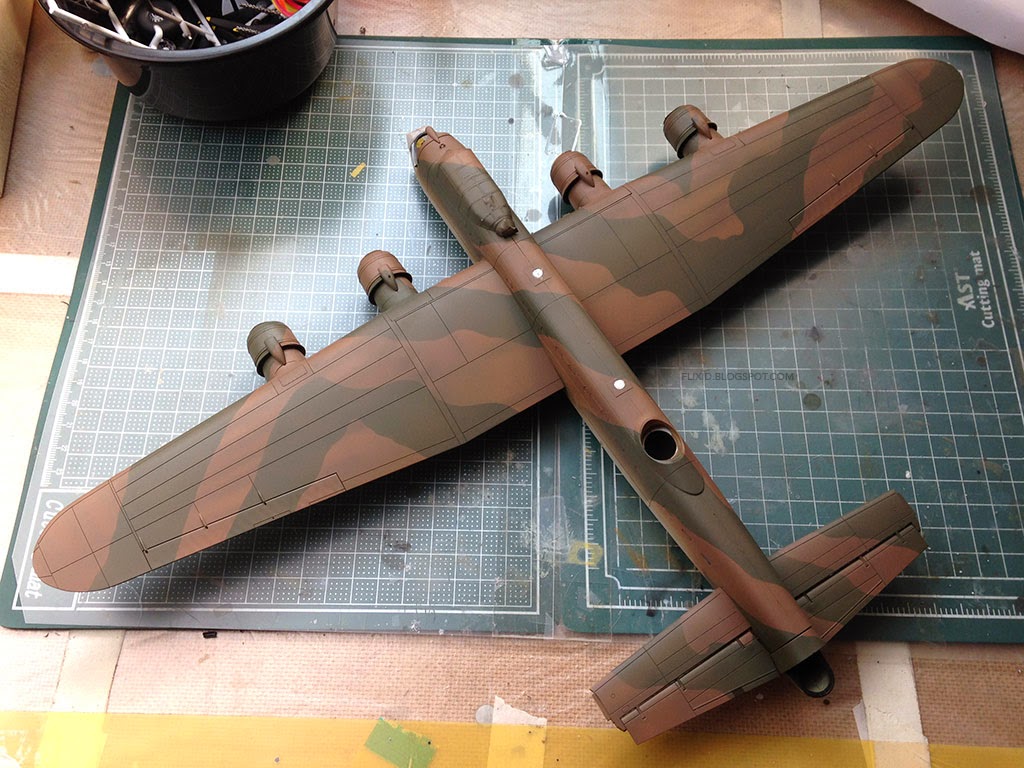
Dark green color applied. The wingspan of this 1/72 scale Lancaster is 43cm. Not only is it big, it takes up a lot of paint as well!


1/72 Airfix Avro Lancaster B.II
Camouflage completed. Next would be painting the underside of the fuselage, adding the rudders, undercarriage, turrets, decals and finally weathering.


To be continued...


Friday, March 21, 2014

1/72 Revell Hawker Hurricane Mk.IIB

I do my modelling work on a tight budget and to reduce the risk of purchasing further "fail kits", I have begun doing some extensive googling on kit & build reviews prior to purchasing them and I have also decided to get a hold of only kits that have been made with new tools in the past 5 years or so. Well, not to be biased but at least that's the case for Revell and Airfix kits.

The Revell Hawker Hurricane Mk.IIB was a delightful and excellent kit to build. All the parts fit nicely with minimum flash and post-build putty work. Unfortunately, I completely forgot to take any photos of the initial part of the build. Here are some taken during the painting process.

Revell 1/72 Hawker Hurricane Mk.IIB
Underside painted first after preshading, then a base coat of dark earth color. Instead of painting an ocean gray color which was applied to post 1941 RAF aircraft, I used dark earth as I felt it would look better on the Hurricane, giving it a more "classic" look.

I use thin-downed (5:5 ratio) Mr.Color lacquer paints for airbrushing and I don't prime my models prior to painting. Letting the paint dry for about a half an hour or so minimizes the risk of the paint peeling off together with the masking tape.


Revell 1/72 Hawker Hurricane Mk.IIB
A photo showing how I create the masks for my camouflage. I google for an image of the camo pattern (or scan the decal instructions in the kit), edit the size to match the wingspan of the model then print it. I then apply a clear sheet of adhesive vinyl over the printed paper, then apply masking tape over the vinyl and mark out the lines and edges with a fine felt-tip pen before cutting out the patterns with a pair of scissors. The reason for applying the vinyl is because if I apply masking tape directly on the paper, it tends to tear of bits of paper while removing the masking tape. 


Revell 1/72 Hawker Hurricane Mk.IIB
Model masked and ready for application of second color. The lines drawn on the masking tape helps in positioning the tape.


Revell 1/72 Hawker Hurricane Mk.IIB
Dark green applied to model.


Revell 1/72 Hawker Hurricane Mk.IIB
Completed painting the colors and masking tape removed. White balance of the photo is a bit off.


Here are photos of the completed model. The gun ports were painted as I felt it was better than using the red decals that came with the kit. The decals were soaked in water then applied onto the model using DecalFix. Using a hairdryer helps quite a lot in quickening the drying process of the decals and shrinking them into the recessed lines and panels.

Revell 1/72 Hawker Hurricane Mk.IIB

Revell 1/72 Hawker Hurricane Mk.IIB

Revell 1/72 Hawker Hurricane Mk.IIB

Revell 1/72 Hawker Hurricane Mk.IIB

Revell 1/72 Hawker Hurricane Mk.IIB

Revell 1/72 Hawker Hurricane Mk.IIB


... And the reason for building a diorama.

Revell 1/72 Hawker Hurricane Mk.IIB

Revell 1/72 Hawker Hurricane Mk.IIB

Revell 1/72 Hawker Hurricane Mk.IIB


1/72 RAF Airfield Diorama - Work in Progress

I've been working on a simple diorama of a WW2 RAF airfield for the past week or so and the main reason being to liven up the photos of my models when posting them. Although it's not completed yet, I thought I might share some photos of the building process.

The kits I purchased for the diorama are :

Airfix 1/76 Control Tower
Airfix 1/76 R.A.F. Refuelling Set
Academy 1/72 Germal Fuel Truck & Schwimmwagen (for German planes)
Hasegawa 1/72 Check Point
Zvezda 1/72 British Bofors 40-mm MkI/II AA-Gun


Airfix Control Tower

Airfix Control Tower
Initial walls and windows build completed. Pretty straightforward build with a little bit of flash on the parts which needed tidying up.


Airfix Control Tower
I wanted to paint the doors and window frames white just like the control tower at RAF Duxford, hence the masking.


Airfix Control Tower
Base coat painted and camoflage pattern painted. The curve mask were made using UHU's Patalfix. It's similar to Blu-Tack but cheaper and less stickier which leaves no residue.


Airfix Control Tower

Airfix Control Tower
Completed control tower with weathered observation decks.

The diorama base was made on a small 50cm x 35cm framed chalkboard which I picked up at a local stationery store for about 5 dollars. The grass is made of grass mats cut to size, the concrete foundation is concrete patterns edited in Photoshop, printed then glued onto a cardboard cut to the appropriate size.


Zvezda Bofors 40mm AA Gun

Zvezda 1/72 Bofors 40mm AA Gun
To be honest, I wasn't expecting much regarding the quality of this kit but I was pleasantly surprised at the detail and precision despite being such a small kit. The parts fit perfectly and there is almost no flash but the parts are so small and fragile, I actually ended up breaking a couple of parts while pressing them together after appying cement. The broken parts were easily fixed.


Zvezda 1/72 Bofors 40mm AA Gun
The completed and weathered AA gun. I also built an enclosed dirt & sandbag emplacement out of putty but they are yet to be painted.


Additional photos of the Bofors AA gun.


Airfix RAF Refuelling Set

The set consists of two trucks; the Bedford QL and AEC Matador. Although the trucks are in 1/76 scale, I couldn't really tell the difference when put next to a 1/72 scale aircraft. However, the ground crew figures (about 6 in total I think) are noticeably small and I will likely not be using them.

The trucks weren't easy to build as there were lots of parts with lots of flash. The instructions aren't very clear so for a detailed build walkthrough, this site should be of help.

I didn't get to take any pictures of the building process but below are photos of the completed models.

RAF Airfield Diorama

RAF Airfield Diorama

RAF Airfield Diorama

RAF Airfield Diorama

RAF Airfield Diorama

RAF Airfield Diorama


Wednesday, March 05, 2014

1/72 Airfix Supermarine Spitfire MkVb

I have finished building the Spitfire from Airfix which I had put on hold.

I airbrushed a gloss finish before applying decals, then later applying a final coat of matt finish and it seems the decals turned out much better than my previous works. Weathering was done with Tamiya's Weathering Master. Did a rather messy job on the underside though.

1/72 Airfix Supermarine Spitfire MkVb

1/72 Airfix Supermarine Spitfire MkVb

1/72 Airfix Supermarine Spitfire MkVb

1/72 Airfix Supermarine Spitfire MkVb

1/72 Airfix Supermarine Spitfire MkVb

1/72 Airfix Supermarine Spitfire MkVb

1/72 Airfix Supermarine Spitfire MkVb

1/72 Airfix Supermarine Spitfire MkVb

1/72 Airfix Supermarine Spitfire MkVb

1/72 Airfix Supermarine Spitfire MkVb